Building a Raspberry Pi security camera
Raspberry Pi computers are great for so many low-power applications, hence my obsession with them, and one of the popular projects I’ve read about is making one into a security camera. Home security and automation are topics I’m very interested in, so I went ahead and built a security camera to try the concept out. I decided to use a Pi Zero W for its small size and particularly low power requirements, and I was also able to find what I’m pretty sure is the original version of the Raspberry Pi camera on Amazon for less than $9.
Parts List


- Raspberry Pi Zero W
- Case for the Pi (includes a short camera cable and a lid with a camera cutout)
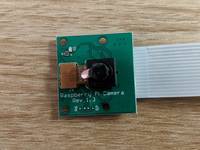
- Camera module
- Long Micro-USB cable for power
- USB charger
- MicroSD card
Preparation
Before doing anything else, I flashed the MicroSD card with the latest version of motionEyeOS, a Linux distribution designed for video surveillance systems which runs on a wide variety of single-board computers including the Pi Zero W. I used balenaEtcher, the recommended tool for creating Raspberry Pi boot media, and the process was very seamless (apart from Windows complaining about the EXT partitions being “unformatted”). I didn’t even need to uncompress the boot image; balenaEtcher handled that for me.
The only other bit of software preparation you probably want to do is pre-configuring your WiFi information. This lets the camera automatically connect to your network when it’s done with its first-time setup. I just followed the directions on the motionEyeOS Wiki and it worked beautifully. All you have to do is create a file named wpa_supplicant.conf on the drive that Windows can see (that’s the /boot partition) and put this text into it, making sure you’re using Unix line endings:
country=US
update_config=1
ctrl_interface=/var/run/wpa_supplicant

network={
    scan_ssid=1
    ssid="MyWiFiSSID"
    psk="S3cr3tp@$$w0rc"
}
And of course, make sure to substitute your own WiFi information (and country code if you’re not in the U.S.).
Assembly
I thought the software would be the hard part and putting the case together would be a breeze, but it was actually the complete opposite. After inserting the MicroSD card, which as you can probably imagine went pretty smoothly, I ran into some issues installing the camera into the case.
The Camera Cable
Strangely enough, the cable that came with my official Pi Zero case had a wide strip of stiff plastic on the end with the connector for the Pi. It was actually wide enough to prevent the Pi from fitting into the case with the cable plugged in.
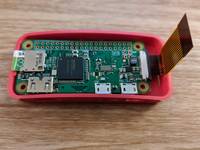
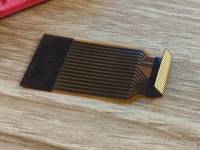
I estimated where to bend the cable based on how much of it would fit into the connector, then took it out and bent it by hand to avoid damaging the connector on the Pi. If your cable is flexible along its whole length, or if the part around the connector is short enough to fit into the case, you won’t have to do this.
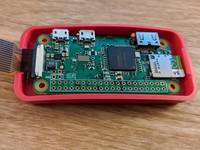
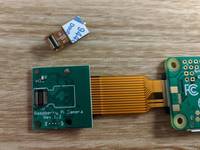
Once your cable is ready, connect it to the camera and then to the Pi. The ribbon cable connectors are a little delicate, but all you really have to do is pull the little plastic bracket straight out, insert the cable as far as it will go, and then snap the bracket back in to hold the cable. The metal contacts on the cable should go towards the circuit board.
The Case
The next step is fitting the Pi Zero W into the bottom of the case. It may take some wiggling, but it will fit pretty snugly when it’s in place, and all the ports should line up.
Once the Pi is in the bottom of the case, fit the camera into the case lid. There are little plastic nubs to fit into the mounting holes on the camera board and tabs on the edges to hold it in place. If you use the cheap V1.3 camera from Amazon, don’t push it in all the way. The camera module doesn’t have quite enough clearance, and the case will actually put enough pressure on it to disconnect the camera module from the board.
You can easily snap the connector back in, but it’s annoying to have to do so. It looks like the camera module has double-sided tape on the back which has not been fully applied, and removing it or using it to stick the module to the board might help. I might try that next time, especially if I get an extra camera board.
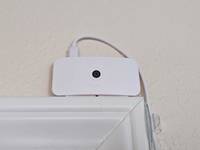
After both the Pi and the camera are in place, just snap the case together. Then you can install the whole thing wherever you want, run the power cable, and you have a cheap indoor security camera running open-source software. As I do more with motionEyeOS, I’m sure I’ll write some more guides about what you can do with it. Stay tuned!